이번 글에서는 블로그 댓글창 커스터마이징, 자바스크립트 댓글 시스템 구축, Supabase 댓글 연동, 광고 진단 스크립트 삽입, 블로그 UX 개선까지 한 번에 해결하는 방법을 정리했습니다. 특히 플러그인에 의존하지 않고 내 코드로 직접 댓글 시스템을 만드는 방법이라서, SEO와 속도, 디자인 자유도까지 모두 챙길 수 있습니다.
목차
오늘 작업의 핵심: ‘자체 댓글 대신 ‘내 코드’
블로그의 기본 댓글창은 디자인 수정이 어렵고, 매크로 공격이나 보안 문제에 취약할 수 있습니다. 우리가 직접 만드는 댓글 시스템은 디자인을 원하는 대로 꾸밀 수 있고, 데이터도 안전하게 관리할 수 있으며, 무엇보다 내 입맛에 맞게 자유롭게 수정할 수 있다는 강력한 장점이 있습니다.
1. 댓글창 위치 지정용 HTML 코드
먼저 댓글을 적용할 블로그(사이트) 글 본문 하단(또는 원하는 위치)에 아래 한 줄만 딱 넣어주면 됩니다.
<div id="comm"></div>
1. 이 코드는 무엇인가요? 이 <div> 태그는 일종의 ‘빈 바구니’입니다. 우리가 작성한 자바스크립트 코드가 id="comm"이라는 이름을 가진 바구니를 찾아서, 그 안에 댓글창 레이아웃과 댓글 목록을 채워넣게 됩니다.
2. 어디에 넣어야 하나요?
방법 B (직접 입력): 글을 쓸 때 HTML 모드로 들어가서 맨 아랫부분에 이 코드를 직접 붙여넣어도 되고, 고정으로 사용할 경우에는 스킨 편집을 통해 본문 하단 또는 원하는 위치에 적용하면 됩니다.
3. 티스토리에 적용하는 방법
- 티스토리 [관리자 페이지]에 접속합니다.
- 왼쪽 메뉴에서 [꾸미기] > [스킨 편집]을 클릭하세요.
- 오른쪽 상단의 [html 편집] 버튼을 누릅니다.
- HTML 코드 창에서 가장 아래쪽으로 내려가
</body>태그 바로 위에 아래 코드를 통째로 붙여넣으세요. - [적용] 버튼을 누르면 끝!
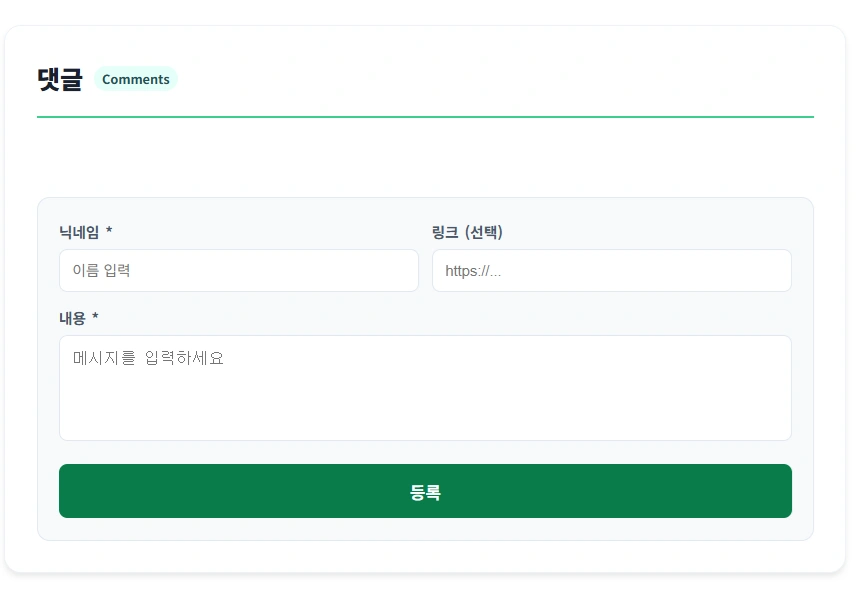
나만의 댓글 시스템 최종 코드
<script src="https://cdn.jsdelivr.net/npm/@supabase/supabase-js"></script>
<script>
    const SUPABASE_URL = ' 주소입력';
    const SUPABASE_KEY = 'sb_publishable_012455555I';

    const client = supabase.createClient(SUPABASE_URL, SUPABASE_KEY);

    function initCommentLayout() {
        const commContainer = document.getElementById('comm');
        if (!commContainer) return;

        const layoutHtml = `
            <div id="supabase-comment-box" style="border: 1px solid #edf2f7; padding: clamp(15px, 5%, 30px); border-radius: 16px; background-color: #ffffff; max-width: 800px; margin: 40px auto; font-family: 'Pretendard', sans-serif; box-shadow: 0 4px 6px -1px rgba(0, 0, 0, 0.1);">
                <div style="display: flex; align-items: center; gap: 10px; margin-bottom: 25px; border-bottom: 2px solid #3ecf8e; padding-bottom: 15px;">
                    <h2 style="margin: 0; color: #1a202c; font-size: 1.5rem; font-weight: 800;">댓글</h2>
                    <span style="background: #e6fffa; color: #234e52; padding: 2px 8px; border-radius: 12px; font-size: 0.75rem; font-weight: 600;">Comments</span>
                </div>

                <div id="comment-list-area" style="margin-bottom: 30px; min-height: 20px;"></div>

                <div style="background: #f7fafc; padding: clamp(15px, 4%, 20px); border-radius: 12px; border: 1px solid #e2e8f0;">
                    <div style="display: grid; grid-template-columns: 1fr 1fr; gap: 12px; margin-bottom: 12px;">
                        <div>
                            <label style="display: block; font-size: 0.875rem; font-weight: 600; color: #4a5568; margin-bottom: 5px;">닉네임 *</label>
                            <input type="text" id="author-name" placeholder="이름 입력" style="width: 100%; padding: 12px; border: 1.5px solid #e2e8f0; border-radius: 8px; font-size: 14px; box-sizing: border-box; outline: none;">
                        </div>
                        <div>
                            <label style="display: block; font-size: 0.875rem; font-weight: 600; color: #4a5568; margin-bottom: 5px;">링크 (선택)</label>
                            <input type="url" id="author-link" placeholder="https://..." style="width: 100%; padding: 12px; border: 1.5px solid #e2e8f0; border-radius: 8px; font-size: 14px; box-sizing: border-box; outline: none;">
                        </div>
                    </div>
                    <div style="margin-bottom: 15px;">
                        <label style="display: block; font-size: 0.875rem; font-weight: 600; color: #4a5568; margin-bottom: 5px;">내용 *</label>
                        <textarea id="comment-text" placeholder="메시지를 입력하세요" style="width: 100%; height: 100px; padding: 12px; border: 1.5px solid #e2e8f0; border-radius: 8px; font-size: 15px; box-sizing: border-box; resize: none; outline: none;"></textarea>
                    </div>
                    <button id="submit-btn" style="width: 100%; background-color: #097c4a; color: #ffffff; border: none; padding: 14px; border-radius: 8px; cursor: pointer; font-weight: 700; font-size: 16px;">등록</button>
                </div>
            </div>`;

        commContainer.innerHTML = layoutHtml;
        document.getElementById('submit-btn').onclick = saveToSupa;
        getComments();
    }

    async function getComments() {
        const { data, error } = await client
            .from('blog_comments')
            .select('*')
            .eq('page_url', window.location.href)
            .order('created_at', { ascending: false });

        const listArea = document.getElementById('comment-list-area');
        if (!listArea) return;

        if (data && data.length > 0) {
            listArea.innerHTML = data.map(c => {
                // 링크가 있으면 이름에 링크를 걸어줌
                const nameTag = c.author_link
                    ? `<a href="${c.author_link}" target="_blank" style="color: #097c4a; text-decoration: underline;">${c.name}</a>`
                    : `<span style="color: #1a202c;">${c.name}</span>`;

                return `
                    <div style="margin-bottom: 20px; padding: 18px; background: #fff; border: 1px solid #f0f0f0; border-radius: 12px;">
                        <div style="display: flex; justify-content: space-between; align-items: center; margin-bottom: 10px;">
                            <strong style="font-size: 15px; font-weight: 700;">${nameTag}</strong>
                            <span style="color: #a0aec0; font-size: 12px;">${new Date(c.created_at).toLocaleString()}</span>
                        </div>
                        <p style="margin: 0; color: #2d3748; font-size: 15px; line-height: 1.6;">${c.content}</p>
                    </div>`;
            }).join('');
        } else {
            listArea.innerHTML = '';
        }
    }

    async function saveToSupa() {
        const nameVal = document.getElementById('author-name').value.trim();
        const linkVal = document.getElementById('author-link').value.trim();
        const bodyVal = document.getElementById('comment-text').value.trim();

        if (!nameVal || !bodyVal) {
            alert('이름과 내용을 모두 입력해 주세요.');
            return;
        }

        const { error } = await client
            .from('blog_comments')
            .insert([{
                name: nameVal,
                author_link: linkVal, // 사용자가 입력한 링크 저장
                content: bodyVal,
                page_url: window.location.href
            }]);

        if (error) {
            alert('오류 발생: ' + error.message);
        } else {
            document.getElementById('author-name').value = '';
            document.getElementById('author-link').value = '';
            document.getElementById('comment-text').value = '';
            getComments();
        }
    }

    window.onload = initCommentLayout;
</script>
이제 블로그 하단에는 방문자들과 대화할 수 있는 깔끔한 댓글창과, 상태를 체크해주는 똑똑한 진단 도구가 자리 잡았습니다.