로컬 환경에서 LLM(거대 언어 모델)을 직접 구동하게 디면 “스크립트를 실행할 때마다 모델을 새로 로드해야 하는데, 이게 맞는 방식인가?” 7B 파라미터 모델 하나를 메모리에 올리는 데만 수십 초가 걸리고, 그 시간 동안 아무것도 할 수 없다면 개발 속도는 물론 사용자 경험도 크게 떨어집니다.
AI를 한 번 띄워 메모리에 상주(Background Service)시키고, 필요한 모든 클라이언트 코드에서 HTTP로 호출하는 구조 로컬 LLM 서버가 가장 효율적수 있습니다. 이번 글에서는 AI를 메모리에 상주해 놓고 실제 작동하는 코드와 함께 정리합니다.
목차
1. 왜 AI 서버를 상주시켜야 할까요?
매번 로드 방식과 상주 방식 비교
| 구분 | 매번 로드 방식 | 상주 방식 (권장) |
|---|---|---|
| 첫 응답 시간 | 모델 크기에 따라 10초~수 분 | 1~3초 이내 |
| 메모리 사용 | 실행마다 VRAM/RAM 중복 점유 | 1회 로드 후 공유 |
| 동시 접속 | 스크립트당 독립 인스턴스 필요 | 단일 서버가 모두 처리 |
| 유지보수 | 클라이언트 수정 시 모델 재로드 | 서버 무중단, 클라이언트만 수정 |
| 개발 편의성 | 디버깅 시 매번 대기 발생 | 즉각 응답으로 개발 속도 향상 |
모델을 메모리에 올려두면 다음과 같은 이점이 있습니다.
- 즉각적인 응답: 매번 모델을 로드할 필요가 없어 첫 응답 속도가 획기적으로 빨라집니다.
- 리소스 공유: 여러 스크립트(웹, GUI, 자동화 봇 등)가 하나의 AI 엔진을 공유하여 메모리 점유를 최적화합니다.
- 유지보수 용이: 클라이언트 코드를 수정해도 AI 서버는 계속 돌아가므로, 개발 효율이 좋아집니다.
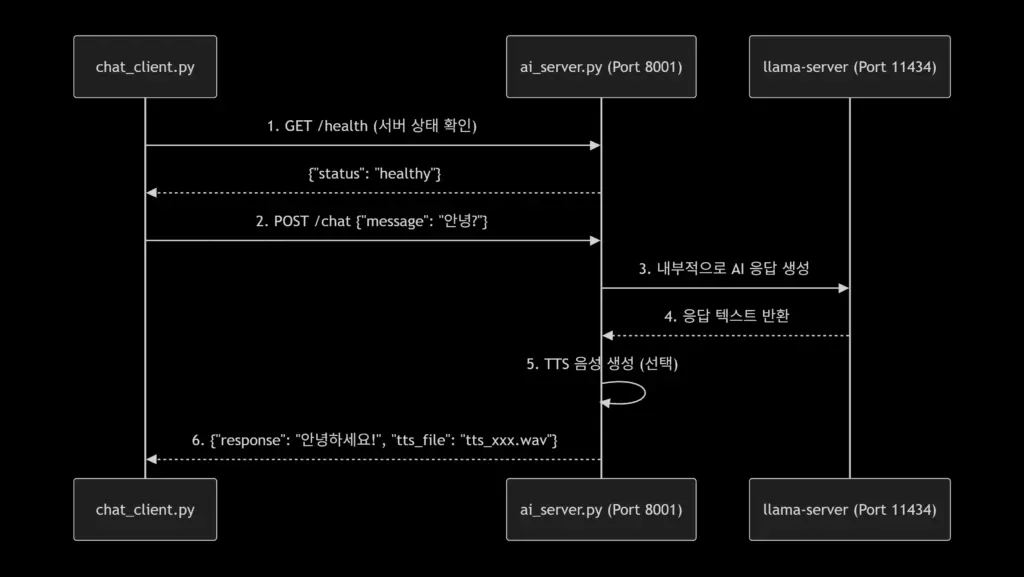
2. 전체 아키텍처 구조
상주 방식의 전체 그림은 다음과 같습니다.
[llama-server / Ollama]  ← 모델 엔진 (포트 8080)
         ↕ HTTP
  [ai_server.py]         ← 비즈니스 로직 래퍼 (포트 8001)
    /chat  /health  /gc
         ↕ HTTP
┌────────────────────────────────┐
│  web_app.py │ auto_task.py │ ... │  ← 클라이언트들
└────────────────────────────────┘
llama.cpp의 llama-server(또는 Ollama)가 실제 모델을 들고 있고, ai_server.py는 이를 감싸는 비즈니스 로직 계층입니다. 클라이언트는 ai서버 바라봅니다. 모델 엔진을 교체해도 클라이언트 코드는 전혀 수정할 필요가 없습니다.
3. AI 서버 구현: ai_server.py
소스 코드에서 가장 중요하지만 빠진 부분이 바로 서버 자체입니다. FastAPI를 사용하면 간결하고 안정적으로 구현할 수 있습니다.
설치
pip install fastapi uvicorn httpxai_server.py 전체 코드
# ai_server.py
import httpx
import asyncio
from fastapi import FastAPI, HTTPException
from pydantic import BaseModel
import gc
import uvicorn

app = FastAPI(title="Local AI Server")

# llama-server 또는 Ollama가 띄워진 주소
LLM_BACKEND_URL = "http://localhost:8080"

class ChatRequest(BaseModel):
    message: str
    system_prompt: str = "You are a helpful assistant."
    max_tokens: int = 1024

class ChatResponse(BaseModel):
    response: str
    success: bool
    tokens_used: int = 0

@app.get("/health")
async def health_check():
    """서버 상태 확인 엔드포인트"""
    try:
        async with httpx.AsyncClient(timeout=3.0) as client:
            resp = await client.get(f"{LLM_BACKEND_URL}/health")
            backend_ok = resp.status_code == 200
    except Exception:
        backend_ok = False
    return {
        "status": "ok",
        "backend_connected": backend_ok,
        "backend_url": LLM_BACKEND_URL
    }

@app.post("/chat", response_model=ChatResponse)
async def chat(req: ChatRequest):
    """채팅 요청 처리 엔드포인트"""
    payload = {
        "model": "local-model",  # Ollama 사용 시 모델명 지정
        "messages": [
            {"role": "system", "content": req.system_prompt},
            {"role": "user", "content": req.message}
        ],
        "max_tokens": req.max_tokens,
        "stream": False
    }
    try:
        async with httpx.AsyncClient(timeout=180.0) as client:
            # llama-server는 /v1/chat/completions, Ollama는 /api/chat
            resp = await client.post(
                f"{LLM_BACKEND_URL}/v1/chat/completions",
                json=payload
            )
            data = resp.json()
            answer = data["choices"][0]["message"]["content"]
            tokens = data.get("usage", {}).get("total_tokens", 0)
            return ChatResponse(response=answer, success=True, tokens_used=tokens)
    except Exception as e:
        raise HTTPException(status_code=500, detail=str(e))

@app.post("/gc")
async def garbage_collect():
    """메모리 정리 엔드포인트"""
    collected = gc.collect()
    return {"status": "gc completed", "objects_collected": collected}

if __name__ == "__main__":
    uvicorn.run(app, host="127.0.0.1", port=8001, log_level="info")
보안 참고:
host="127.0.0.1"로 바인딩하면 로컬 머신에서만 접근 가능합니다. 외부 네트워크에 노출이 필요한 경우 반드시 인증 미들웨어(API Key 헤더 검증 등)를 추가하세요.
4. 핵심 통신 구조: Client-Server 모델
ai_server.py가 로컬 포트(8001)에서 대기하고 있고, 필요한 곳에서 요청을 보내는 방식입니다.
서버와의 핵심 연결 코드
가장 간단한 연결 코드를 모듈화하여 어디서든 불러다 쓸 수 있게 만듭니다.
import requests

class AIClient:
    def __init__(self, url="http://localhost:8001"):
        self.server_url = url

    def send_message(self, text):
        try:
            response = requests.post(
                f"{self.server_url}/chat",
                json={"message": text},
                timeout=180
            )
            return response.json()
        except Exception as e:
            return {"error": str(e), "success": False}
비동기(Async) 버전: 동시 요청이 많을 때
여러 요청을 병렬로 보내야 하는 상황(배치 처리, 동시 사용자 등)에서는 asyncio와 httpx를 활용한 비동기 클라이언트가 훨씬 효율적입니다.
import httpx
import asyncio

class AsyncAIClient:
    def __init__(self, url="http://localhost:8001"):
        self.server_url = url

    async def send_message(self, text: str) -> dict:
        async with httpx.AsyncClient(timeout=180.0) as client:
            try:
                response = await client.post(
                    f"{self.server_url}/chat",
                    json={"message": text}
                )
                return response.json()
            except Exception as e:
                return {"error": str(e), "success": False}

    async def send_batch(self, messages: list[str]) -> list[dict]:
        """여러 메시지를 동시에 처리"""
        tasks = [self.send_message(msg) for msg in messages]
        return await asyncio.gather(*tasks)

# 사용 예시
async def main():
    client = AsyncAIClient()
    results = await client.send_batch([
        "첫 번째 질문",
        "두 번째 질문",
        "세 번째 질문"
    ])
    for r in results:
        print(r.get("response"))

asyncio.run(main())
5. 여러 코드에서 연결하여 사용하기
이제 AIClient 클래스를 활용해 다양한 상황에서 AI를 호출해 봅시다.
A. 웹 앱에서 연동하기 (web_app.py)
사용자의 입력을 받아 실시간으로 AI 응답을 화면에 보여줄 때 사용합니다.
client = AIClient()
user_input = "오늘 날씨 어때?"
result = client.send_message(user_input)
print(f"AI 답변: {result.get('response')}")
B. 자동화 스크립트에서 호출하기 (auto_task.py)
특정 조건이 충족되면 AI가 자동으로 보고서를 작성하거나 분석하도록 할 수 있습니다.
client = AIClient()
# 업무 분석 요청
report = client.send_message("이 로그 데이터 분석해줘: [데이터...]")
print(f"분석 결과: {report.get('response')}")
C. 시스템 프롬프트를 달리하여 전문화된 클라이언트 만들기
같은 서버를 쓰면서도 역할에 따라 다른 시스템 프롬프트를 주입할 수 있습니다.
import requests

class SpecializedAIClient:
    def __init__(self, url="http://localhost:8001", role="assistant"):
        self.server_url = url
        self.system_prompts = {
            "coder":      "당신은 Python 전문 개발자입니다. 코드와 기술적 설명 위주로 답하세요.",
            "translator": "당신은 한영 번역 전문가입니다. 번역 결과만 출력하세요.",
            "summarizer": "당신은 문서 요약 전문가입니다. 핵심만 3줄로 요약하세요.",
            "assistant":  "You are a helpful assistant."
        }
        self.role = role

    def ask(self, text: str) -> str:
        payload = {
            "message": text,
            "system_prompt": self.system_prompts.get(self.role, "")
        }
        try:
            resp = requests.post(f"{self.server_url}/chat", json=payload, timeout=180)
            return resp.json().get("response", "")
        except Exception as e:
            return f"오류: {e}"

# 코드 리뷰 전용
coder = SpecializedAIClient(role="coder")
print(coder.ask("이 코드의 문제점을 찾아줘: for i in range(len(lst)): print(lst[i])"))

# 문서 요약 전용
summarizer = SpecializedAIClient(role="summarizer")
print(summarizer.ask("긴 문서 내용..."))
6. 서버 영구 상주 설정
개발 중에는 터미널에서 직접 실행하면 되지만, 운영 환경에서는 시스템 재부팅 후에도 자동으로 서버가 올라와야 합니다.
Linux: systemd 서비스로 등록
# /etc/systemd/system/ai-server.service
[Unit]
Description=Local AI Background Server
After=network.target

[Service]
Type=simple
User=your_username
WorkingDirectory=/home/your_username/ai_project
ExecStart=/home/your_username/miniconda3/envs/ai/bin/python ai_server.py
Restart=on-failure
RestartSec=5

[Install]
WantedBy=multi-user.target
# 서비스 등록 및 시작
sudo systemctl daemon-reload
sudo systemctl enable ai-server
sudo systemctl start ai-server
# 상태 확인
sudo systemctl status ai-serverWindows: pythonw로 백그라운드 실행
:: start_ai_server.bat
@echo off
start "AI Server" pythonw ai_server.py
echo AI 서버가 백그라운드에서 시작되었습니다.
시작 프로그램에 등록하려면 Win + R → shell:startup → 위 배치 파일의 바로가기를 붙여넣기 하면 됩니다.
7. 서버 관리 및 문제 해결
AI 서버가 메모리에 잘 상주하고 있는지 확인하는 습관이 중요합니다.
서버 상태 확인 코드
import requests

def check_ai_status():
    try:
        resp = requests.get("http://localhost:8001/health", timeout=3)
        if resp.status_code == 200:
            print("AI 서버가 정상적으로 상주 중입니다.")
    except:
        print("서버가 연결되지 않았습니다. ai_server.py를 먼저 실행하세요.")
연결 문제 해결 체크리스트
- 포트 확인:
netstat -ano | findstr 8001명령어로 서버가 8001번 포트를 점유하고 있는지 확인하세요. - 메모리 정리: 응답이 느려지거나 서버가 무거워지면
/gc엔드포인트를 호출하여 메모리 정리를 수행하세요. - 로그 확인: 서버 실행 터미널에 출력되는 로그를 통해 어떤 요청이 들어오고 있는지 실시간으로 모니터링하세요.
증상별 트러블슈팅 표
| 증상 | 원인 | 해결책 |
|---|---|---|
Connection refused | 서버 미실행 또는 포트 불일치 | python ai_server.py 실행 확인, 포트 번호 점검 |
| 응답 시간이 갑자기 길어짐 | llama-server 백엔드 과부하 | /gc 호출 후 백엔드 재시작 |
timeout 오류 | 모델 추론 시간 초과 | timeout 값 증가 또는 max_tokens 감소 |
| 서버 재부팅 후 미실행 | systemd 등록 누락 | systemctl enable ai-server 재확인 |
| 메모리 사용량 지속 증가 | 응답 객체 누수 | 정기적 /gc 호출 스케줄 추가 |
AI 서버를 한 번만 실행해 메모리에 상주시키면, 그 이후부터는 requests 라이브러리를 통해 어디서든 간편하게 지능형 기능을 가져다 쓸 수 있습니다. 이제 여러분의 모든 파이썬 스크립트가 AI와 하나로 연결되어 더 강력한 능력을 발휘할 것입니다.
핵심 아키텍처를 정리하면 다음과 같습니다.
- llama-server / Ollama: 실제 모델 엔진, 포트 8080에서 항상 대기
- ai_server.py (FastAPI): 비즈니스 로직 래퍼, 포트 8001에서 클라이언트 요청 수신
- AIClient / AsyncAIClient: 모든 파이썬 스크립트에서 재사용 가능한 연결 모듈
- systemd / 배치파일: 시스템 재부팅 후에도 자동 상주 보장